UICollectionView的简单介绍
在iOS6发布前,开发人员都习惯用UITableView来展示所有类型的数据集合。虽然苹果公司在照片应用中使用过很长一段时间类似UICollectionView视图的UI,但第三方开发人员无法使用它。当时我们可以利用第三方框架(如three20)来做类似的功能。在iOS6苹果引入了一个新的控制器UICollectionViewController。提供了一个更加优雅的方法,把各种类型的数据显示在视图中。
现在, 在各种类型的APP中,UICollectionView的身影随处可见,不管在什么应用,总有UICollectionView的应用场景,而苹果也在iOS10中对UICollectionView做了更好的优化。本文主要是展示UICollectionView的常用动画和装逼动画,也会在本文对所有的动画进行详细的讲解。先看效果
效果1:
效果2 : 圆形放大

效果3 :

效果4:
开车前
大家看标题就能知道,前两个效果需要掌握自定义转场的相关姿势,如果有的同学不太了解,简书上有很多相关的文章.也可以参考下喵神的的博客->WWDC 2013 Session笔记 - iOS7中的ViewController切换.或者先看下相册效果实现的思路.
效果1实现思路
先说下长按拖拽单元格的实现,这个是最简单的,只需要实现UICollectionView的collectionView?.moveItemAtIndexPath(NSIndexPath, toIndexPath: NSIndexPath)所以我们要先记录移动之前的indexPath记录为lastPath,根据手指的位置获取目标位置的indexPath记录为curPath,移动完成后记录lastPath = curPath就能实现拖拽单元格的动画效果。最后一步就是修改数据源了,刚开始做的时候我傻逼的在手势结束的修改数据源,这是不行的.因为在移动的时候单元格已经变化太多了,所以一定要在移动的状态修改数据源.
添加长按手势
1
2
| let longGest = UILongPressGestureRecognizer(target: self, action: "longGestHandle:")
collectionView?.addGestureRecognizer(longGest)
|
核心代码
1
2
3
4
5
6
7
8
9
10
11
12
13
14
15
16
17
18
19
20
21
22
23
24
25
26
27
28
29
30
31
32
33
34
35
36
37
38
39
40
41
42
43
44
45
46
47
48
49
50
51
52
53
54
55
56
57
58
59
60
61
62
63
| func longGestHandle(longGest : UILongPressGestureRecognizer){
switch longGest.state{
case .Began :
let touchP = longGest.locationInView(collectionView)
guard let indexPath = collectionView?.indexPathForItemAtPoint(touchP) else {return}
curPath = indexPath
lastPath = indexPath
let cell = collectionView?.cellForItemAtIndexPath(indexPath) as! TheFirstCell
self.cell = cell
let imageView = UIImageView()
imageView.frame = cell.frame
imageView.image = cell.image
imageView.transform = CGAffineTransformMakeScale(1.15, 1.15)
collectionView?.addSubview(imageView)
self.imageView = imageView
case .Changed :
cell?.alpha = 0
let touchP = longGest.locationInView(collectionView)
imageView?.center = touchP
let indexPath = collectionView?.indexPathForItemAtPoint(touchP)
if (indexPath != nil) {
curPath = indexPath
collectionView?.moveItemAtIndexPath(lastPath!, toIndexPath: curPath!)
}
if lastPath != nil{
let lastImg = imageArr[lastPath!.item]
imageArr.removeAtIndex(lastPath!.item)
imageArr.insert(lastImg, atIndex: curPath!.item)
lastPath = curPath
}
case .Ended :
imageView?.removeFromSuperview()
cell?.alpha = 1
default : break
}
}
}
|
图片浏览器思路
思考
- 点击
cellModal出来的View是什么类型的?
- 怎么让Modal的
View显示cell里面的图片?
- 怎么才能知道点击
cell的frame?
- 怎么才能知道dismiss之后
cell的frame?
第一个问题的答案已经很明显了,肯定是UICollectionView,我们可以在modalVC用属性记录点击cell的indexPath,通过调用 collectionView.scrollToItemAtIndexPath(NSIndexPath, atScrollPosition: UICollectionViewScrollPosition, animated: Bool),值得注意的是animated要传false,你懂得.
关于第三个问题,我们可以直接计算让modalVC的一个属性来接收.我们还可以通过另外一种优雅的方式(代理)来获取。
第四个问题,因为最终的indexPath只有modalVC才能知道,所以也能通过代理来获得dismiss之后cell的frame.
协议和代理方法的定义
1
2
3
4
5
6
7
8
9
10
11
| protocol PresentedProtocol : class{
func getImageView(indexPath : NSIndexPath) -> UIImageView
func getStartRect(indexPath : NSIndexPath) -> CGRect
func getEndRect(indexPath : NSIndexPath) -> CGRect
func getEndCell(indexPath : NSIndexPath) -> TheFirstCell?
}
protocol dismissProtocol : class{
func getImageView() -> UIImageView
func getEndRect() -> NSIndexPath
}
|
代理方法的实现
Presented部分
1
2
3
4
5
6
7
8
9
10
11
12
13
14
15
16
17
18
19
20
21
22
23
24
25
26
27
28
29
30
31
32
33
34
35
36
37
38
39
40
41
42
43
44
45
| extension TheFirstViewController : PresentedProtocol{
func getImageView(indexPath: NSIndexPath) -> UIImageView {
let imageView = UIImageView()
imageView.contentMode = .ScaleAspectFill
imageView.clipsToBounds = true
let cell = collectionView?.cellForItemAtIndexPath(indexPath) as! TheFirstCell
imageView.image = cell.imageView.image
return imageView
}
func getStartRect(indexPath: NSIndexPath) -> CGRect {
let cell = collectionView?.cellForItemAtIndexPath(indexPath) as? TheFirstCell
if cell == nil{
return CGRectZero
}
let startRect = collectionView!.convertRect(cell!.frame, toCoordinateSpace: UIApplication.sharedApplication().keyWindow!)
return startRect
}
func getEndRect(indexPath: NSIndexPath) -> CGRect {
let cell = collectionView?.cellForItemAtIndexPath(indexPath) as! TheFirstCell
return calculateWithImage(cell.imageView.image!)
}
func getEndCell(indexPath: NSIndexPath) -> TheFirstCell? {
var cell = collectionView?.cellForItemAtIndexPath(indexPath) as? TheFirstCell
if cell == nil{
collectionView?.scrollToItemAtIndexPath(indexPath, atScrollPosition: .Right, animated: false)
cell = collectionView?.cellForItemAtIndexPath(indexPath) as? TheFirstCell
return cell
}
return cell!
}
}
|
dismiss部分
1
2
3
4
5
6
7
8
9
10
11
12
13
14
15
16
17
18
19
20
21
22
23
|
extension YJBrowserViewController : dismissProtocol{
func getImageView() -> UIImageView {
let cell = collectionView.visibleCells().first as! YJBrowserCell
let imageView = UIImageView()
imageView.image = cell.imageView.image
imageView.contentMode = .ScaleToFill
imageView.clipsToBounds = true
imageView.frame = cell.imageView.frame
return imageView
}
func getEndRect() -> NSIndexPath {
let cell = collectionView.visibleCells().first as! YJBrowserCell
return collectionView.indexPathForCell(cell)!
}
}
|
动画核心代码
1
2
3
4
5
6
7
8
9
10
11
12
13
14
15
16
17
18
19
20
21
22
23
24
25
26
27
28
29
30
31
32
33
34
35
| extension YJBrowserAnimator{
func presentAnimate(transitionContext : UIViewControllerContextTransitioning){
let containerView = transitionContext.containerView()
containerView?.backgroundColor = UIColor.blackColor()
let toView = transitionContext.viewForKey(UITransitionContextToViewKey)
toView?.alpha = 0
containerView?.addSubview(toView!)
guard let presentDelegate = presentDelegate else{
return
}
let imageView = presentDelegate.getImageView(indexPath!)
imageView.frame = presentDelegate.getStartRect(indexPath!)
containerView?.addSubview(imageView)
UIView .animateWithDuration(transitionDuration(transitionContext), animations: { () -> Void in
imageView.frame = presentDelegate.getEndRect(self.indexPath!)
}) { (_) -> Void in
toView?.alpha = 1
imageView.removeFromSuperview()
transitionContext.completeTransition(true)
}
}
}
|
效果2实现思路
首先,要实现这个效果,要用到CALayer的mask属性,mask属性很容易理解,就是一个遮罩,这个动画就是用一个圆形的遮罩不断地放大。遮罩也是一个CALayer,但是CALayer并不能完成这样的效果,这个时候我们可以使用它的子类CAShapeLayer.该子类有个属性path,可以画出各种图形.
当点击某个cell的时候,就以它的中心点为圆心,接下来就是求圆形半径的问题了,求半径的思路有两种。
半径思路一
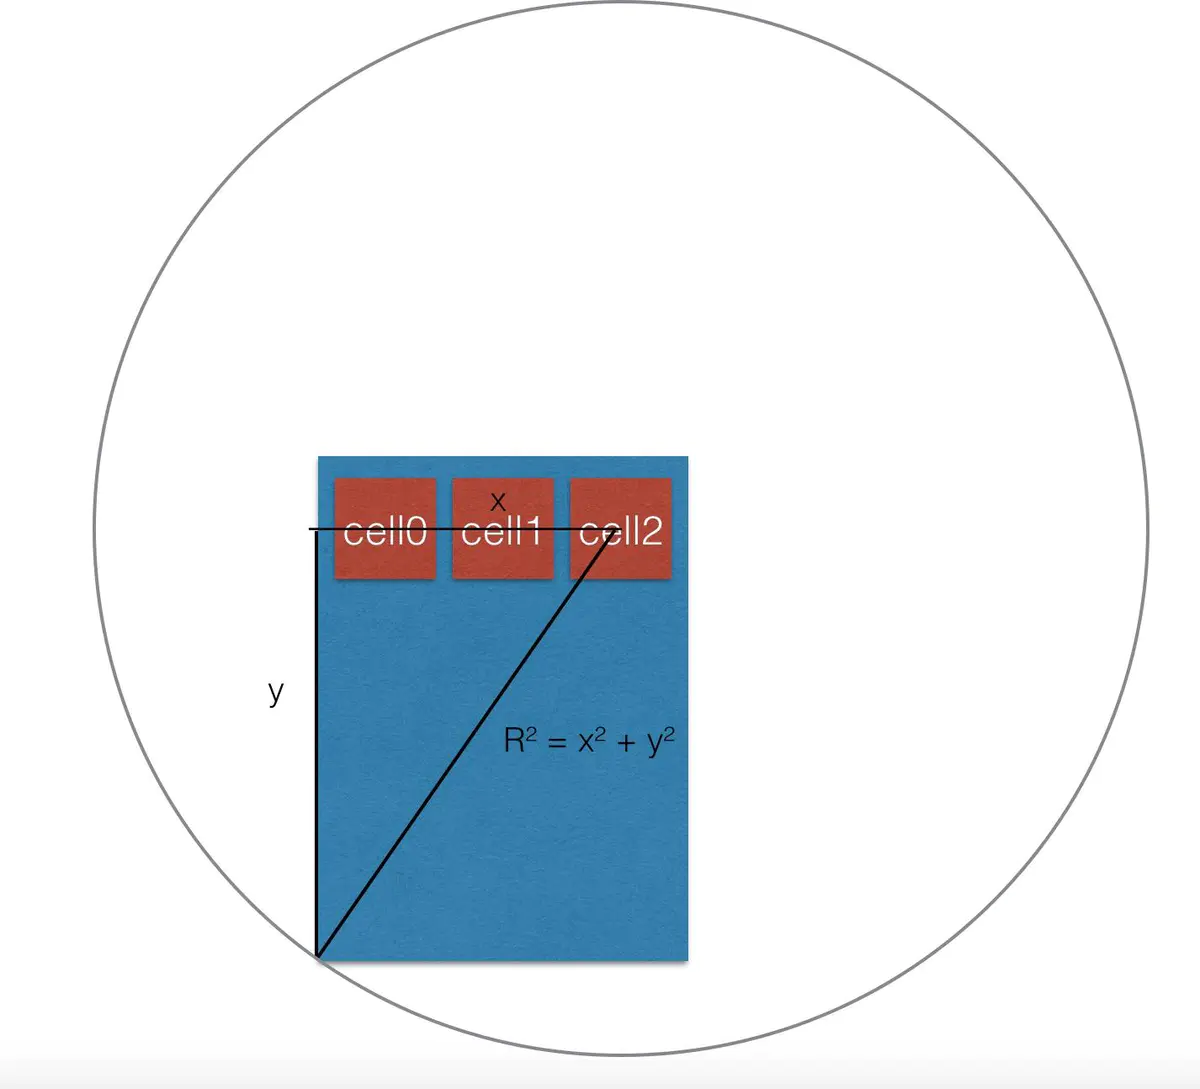
注意:如果点击的是cell0,就不能以cell0的中心点连线到左下角了,因为用这样的半径画出来的圆是不能覆盖整个屏幕的,所以要连线到右下角才可以.因此得出x = cell.center.x或者 x = collectionView.width - cell.center.x。我们可以用数学函数max()来获得x值而不是通过复杂的条件语句
半径思路二
以屏幕中心点为圆心,根据屏幕width和height求出来的半径来画一个圆,这样也可以实现.我在dismiss的时候就是用得这个方法。下面上代码
presented部分核心代码
1
2
3
4
5
6
7
8
9
10
11
12
13
14
15
16
17
18
19
20
21
22
23
24
25
26
27
28
29
30
31
32
33
34
35
36
37
38
39
40
41
42
43
44
45
46
47
48
49
50
51
| extension YJBrowserAnimator{
func maskPresentAnimate(transitionContext : UIViewControllerContextTransitioning){
self.transitionContext = transitionContext
let containerView = transitionContext.containerView()
let toView = transitionContext.viewForKey(UITransitionContextToViewKey)
transitionContext.containerView()!.addSubview(toView!)
guard let presentDelegate = presentDelegate else{return}
guard let indexPath = indexPath else{return}
let imageView = presentDelegate.getImageView(indexPath)
imageView.frame = presentDelegate.getStartRect(indexPath)
let startCircle = UIBezierPath(ovalInRect: presentDelegate.getStartRect(indexPath))
let x = max(imageView.center.x, UIScreen.mainScreen().bounds.width - imageView.center.x)
let y = max(imageView.center.y, CGRectGetHeight(UIScreen.mainScreen().bounds) - imageView.center.y)
let startRadius = sqrt(pow(x,2) + pow(y,2))
let endPath = UIBezierPath(ovalInRect: CGRectInset(imageView.frame, -startRadius, -startRadius))
let shapeLayer = CAShapeLayer()
shapeLayer.path = endPath.CGPath
toView?.layer.mask = shapeLayer
let animation = CABasicAnimation(keyPath: "path")
animation.fromValue = startCircle.CGPath
animation.toValue = endPath.CGPath
animation.duration = transitionDuration(transitionContext)
animation.delegate = self
shapeLayer.addAnimation(animation, forKey: "")
}
override func animationDidStop(anim: CAAnimation, finished flag: Bool) {
if isMask{
transitionContext?.completeTransition(true)
transitionContext?.viewControllerForKey(UITransitionContextFromViewControllerKey)?.view.layer.mask = nil
transitionContext?.viewForKey(UITransitionContextFromViewKey)?.removeFromSuperview()
}
}
}
|
dismiss部分核心代码
1
2
3
4
5
6
7
8
9
10
11
12
13
14
15
16
17
18
19
20
21
22
23
24
25
26
27
28
29
30
31
32
| extension YJBrowserAnimator {
func maskDismissAnimate(transitionContext : UIViewControllerContextTransitioning){
self.transitionContext = transitionContext
let containerView = transitionContext.containerView()
let fromView = transitionContext.viewForKey(UITransitionContextFromViewKey)
let startRect = presentDelegate?.getStartRect((dismissDelegate?.getEndRect())!)
let endPath = UIBezierPath(ovalInRect: startRect!)
let radius = sqrt(pow((containerView?.frame.size.height)!,2) + pow((containerView?.frame.size.width)!,2)) / 2
let startPath = UIBezierPath(arcCenter: containerView!.center, radius: radius, startAngle: 0, endAngle: CGFloat(M_PI * 2), clockwise: true)
let shapeLayer = CAShapeLayer()
shapeLayer.path = endPath.CGPath
shapeLayer.backgroundColor = UIColor.clearColor().CGColor
fromView!.layer.mask = shapeLayer
let animate = CABasicAnimation(keyPath: "path")
animate.fromValue = startPath.CGPath
animate.toValue = endPath.CGPath
animate.duration = transitionDuration(transitionContext)
animate.delegate = self
shapeLayer.addAnimation(animate, forKey: "")
}
}
|
效果3动画思路
首先,介绍UICollectionViewLayout的几个方法,在这个案例中,我们需要重写这几个方法。
1
| func layoutAttributesForElementsInRect(_ rect: CGRect) -> [UICollectionViewLayoutAttributes]?
|
这个方法返回指定rect中cell的布局属性(layoutAttributes)数组。默认返回nil,这个方法是只要拖动UICollectionView的时候就会调用
我们来看一下UICollectionViewLayoutAttributes的头文件有哪些属性
1
2
3
4
5
6
7
8
9
10
11
12
13
14
15
16
17
18
19
20
21
22
23
| @available(iOS 6.0, *)
public class UICollectionViewLayoutAttributes : NSObject, NSCopying, UIDynamicItem {
public var frame: CGRect
public var center: CGPoint
public var size: CGSize
public var transform3D: CATransform3D
@available(iOS 7.0, *)
public var bounds: CGRect
@available(iOS 7.0, *)
public var transform: CGAffineTransform
public var alpha: CGFloat
public var zIndex: Int
public var hidden: Bool
public var indexPath: NSIndexPath
public var representedElementCategory: UICollectionElementCategory { get }
public var representedElementKind: String? { get }
public convenience init(forCellWithIndexPath indexPath: NSIndexPath)
public convenience init(forSupplementaryViewOfKind elementKind: String, withIndexPath indexPath: NSIndexPath)
public convenience init(forDecorationViewOfKind decorationViewKind: String, withIndexPath indexPath: NSIndexPath)
}
|
可以看到这个对象可以拿到cell的frame、center、size、transform3D等属性,而且都是readWrite,我们可以利用这个方法,来实时改变cell的transform,达到我们想要的效果
思路:看效果3的gif可以发现,当cell离collectionView得中心点越近,尺寸就越大,当它们的中心点重合的时候,cell的尺寸就是最大。所以要算出cell的中心点和collectionView中心点的距离。
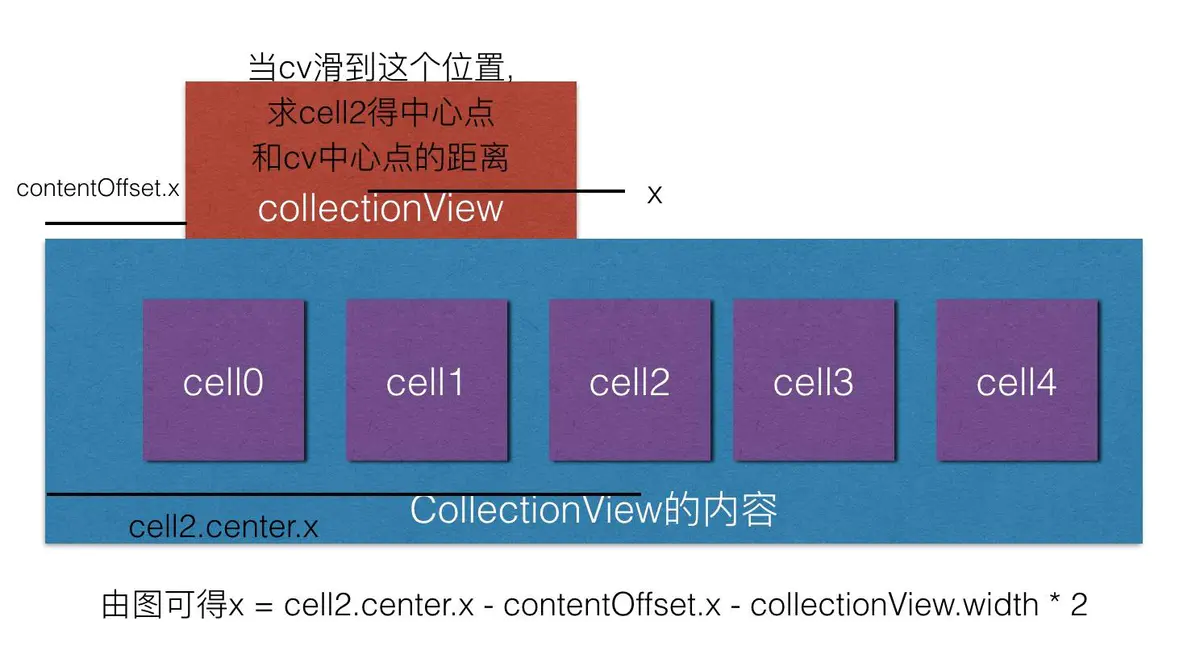
图画得不好,大家凑合看看吧。计算完距离,下一步就是要计算缩放比例了,这一步大家可以按照自己的需求来计算.我的方案是:当cell的中心点离collectionView的中心点是collectionView.width * 0.5时,就缩放3/4
核心代码
1
2
3
4
5
6
7
8
9
10
11
12
13
14
15
16
17
18
| override func layoutAttributesForElementsInRect(rect: CGRect) -> [UICollectionViewLayoutAttributes]? {
guard let arr = super.layoutAttributesForElementsInRect(collectionView!.bounds) else{return nil}
let cellAttrs = NSArray.init(array: arr, copyItems: true) as! [UICollectionViewLayoutAttributes]
for cellAttr in cellAttrs {
let offsetX = collectionView!.contentOffset.x
let cellDistance = fabs(cellAttr.center.x - ((collectionView?.bounds.width)! * 0.5 + offsetX))
let scale = 1 - cellDistance / ((collectionView?.bounds.width)! * 0.5) * 0.25
cellAttr.transform = CGAffineTransformMakeScale(scale, scale)
}
return cellAttrs
}
|
进一步思考
能不能在松手的时候计算cell的缩放比例,让比较大的cell的中心点和collectionView的中心点对齐?可以使用这个方法
1
2
| func targetContentOffsetForProposedContentOffset(_ proposedContentOffset: CGPoint,
withScrollingVelocity velocity: CGPoint) -> CGPoint
|
当我们松手的时候,就会调用这个方法,默认的返回值是proposedContentOffset
1
2
3
|
proposedContentOffset : 该滚动的位置.(举个🌰,踢足球的时候一脚把球踢飞,没人阻拦的情况下足球停下的位置就是proposedContentOffset)
velocity : 滚动的速度
|
核心代码
1
2
3
4
5
6
7
8
9
10
11
12
13
14
15
16
17
18
19
20
21
22
23
24
25
| override func targetContentOffsetForProposedContentOffset(proposedContentOffset: CGPoint, withScrollingVelocity velocity: CGPoint) -> CGPoint {
guard let arr = super.layoutAttributesForElementsInRect(CGRect(origin: CGPoint(x: proposedContentOffset.x, y: 0), size: collectionView!.bounds.size)) else {return CGPointZero}
var lesserDis = CGFloat(MAXFLOAT)
var proposedContentOffsetX = proposedContentOffset.x
for cellAttr in arr {
let cellDistance = cellAttr.center.x - (collectionView!.bounds.width * 0.5 + proposedContentOffset.x)
if fabs(cellDistance) < fabs(lesserDis) {
lesserDis = cellDistance
}
}
proposedContentOffsetX += lesserDis
if proposedContentOffsetX < 0{
proposedContentOffsetX = 0
}
return CGPoint(x: proposedContentOffsetX, y: proposedContentOffset.y)
}
|
效果4思路
和效果3完全一样。
额外补充
在效果3中,用到了CAShapeLayer和mask.如果还对这两个不太明白的话,推荐一些博客给大家能够更加清楚的了解
关于CAShapeLayer
放肆的使用UIBezierPath和CAShapeLayer画各种图形
关于mask
关于使用CALayer中mask的一些技巧
用好mask能做出比较酷炫的动画,比如
或者iPhone锁屏的文字效果

具体可以看下这边文章->Facebook Shimmer 实现原理
还有iOS10 UICollectionView的新特性
WWDC2016 Session笔记 - iOS 10 UICollectionView新特性


